
Ever struggled with reaching those high branches while pruning your trees? Imagine a tool that could make this task a breeze. How about attaching a power pruner to your arsenal?
You’re not alone in seeking a solution to this common gardening challenge. With a power pruner in hand, you’ll effortlessly trim even the tallest branches, saving you time and effort.
In this article, you’ll discover the step-by-step guide on how to attach a power pruner like a pro. Get ready to elevate your tree-trimming game and enjoy the benefits of a beautifully manicured garden without the hassle.
Selecting the Right Power Pruner
When it comes to selecting the right power pruner for your tree-trimming needs, you want to make sure you choose a tool that’s efficient and easy to use. Here are some essential factors to consider when making your selection:
- Reach: Consider the height of the branches you’ll be trimming to ensure the power pruner you choose has enough reach. Opt for a model with telescoping features for added versatility.
- Cutting Capacity: Look for a power pruner with a sufficient cutting capacity to handle the diameter of the branches you’ll be pruning. Choosing a pruner with a sharp blade can make the task much smoother.
- Power Source: Decide whether you prefer a corded, cordless, or gas-powered pruner based on your specific needs. Cordless models offer freedom of movement, while gas-powered pruners provide strong cutting power.
- Weight: Ensure that the power pruner you select is lightweight and comfortable to use for an extended period. This will help reduce fatigue during longer pruning sessions.
- Safety Features: Prioritize safety by choosing a power pruner with safety lock mechanisms and easy-to-reach controls to prevent accidents during operation.
By considering these factors, you can choose a power pruner that best suits your needs and enables you to tackle tree-trimming tasks effortlessly and efficiently.
Recommended Products

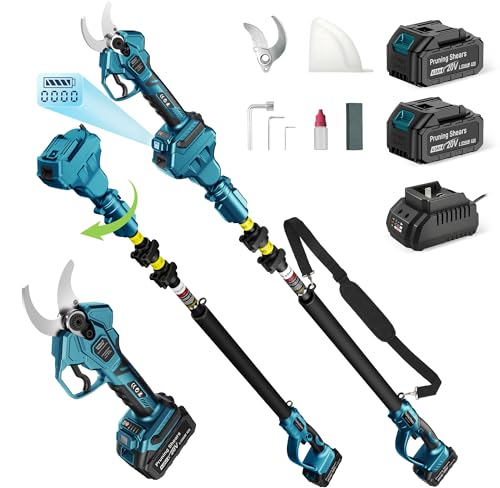
【Telescoping Handle: Versatile and Flexible】 Trim high branches and low shrubs without ever leaving the ground. The telescoping handle extends up to 3.3 ft—so you can say goodbye to wobbly ladders and dangerous stretching. Whether you're pruning trees, prepping firewood, or clearing campsites, this 12-inch brushless pole saw delivers professional results safely

【4-in-1 Pole Saw and Pruner Kit】Combines electric pruning shears, a 6-inch cordless pole saw, telescopic extension pole, and 2 batteries into one complete tree trimming kit. Use the pruning shears with pole to reach high branches, or detach the tools for low shrubs, thin twigs, and ground-level branch cutting. The telescoping pole extends up to 9.5 ft, helping homeowners trim trees without ladders and making yard maintenance safer, faster, and easier.
Preparing the Power Pruner for Attachment
Before attaching your power pruner, it’s essential to prepare it properly. Here’s how to get your power pruner ready for action:
- Inspect the power pruner for any damage or wear.
- Ensure it is clean and free of any obstructions.
- Check the blade for sharpness and tightness.
- Inspect the chain for tension and adjust if needed.
After preparing your power pruner, you’re ready to move on to the next step.
Attaching the Power Pruner to the Extension Pole
When attaching the power pruner to the extension pole, follow these key steps to ensure a secure connection:
- Step 1: Align the attachment point on the power pruner with the connection mechanism on the extension pole.
- Step 2: Insert the attachment point into the mechanism until it clicks into place.
- Step 3: Give the power pruner a gentle tug to confirm it’s securely attached before operation.
Remember, a proper attachment is essential for safe and efficient tree-trimming.
Recommended Products

【2-in-1 Electric Pruner with Extended Reach】Easily switch between handheld and pole modes to handle branches at any height. The extendable pole stretches from 4.9 to 9.4 FT (up to 15 FT reach), allowing you to trim tall trees safely from the ground — no ladder required. This versatile design makes pruning faster, safer, and more efficient for all your garden and landscaping needs.
【2-in-1 Pole Pruner with Extension Rod】Effortlessly switch between handheld and pole modes (range: 5.4 ft to 9.2 ft). Our battery pruning shears allows you to easily trim low shrubs or reach high branches with precision. With 4 adjustable cutting diameters (0.4"-0.6"-1"-1.6"), it meets various pruning needs for gardens, yards, orchards, farms, and more. Ideal for a variety of gardening tasks!
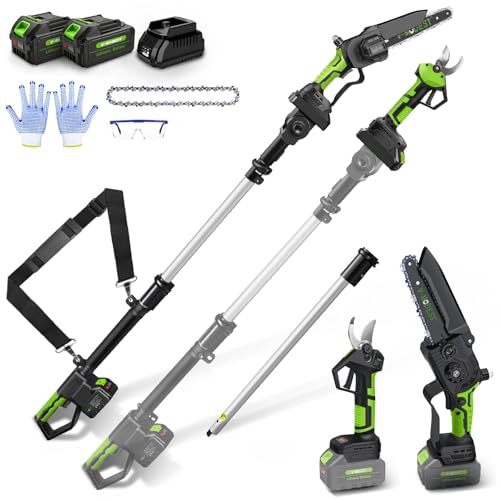
【4-in-1 Pruning System - One Tool for All Yard Need】Tired of switching between loppers, saws, ladders, and pruners? Our professional 4-in-1 electric pole saw & pruning shears kit can replace four tools: pole saw, pruning shears, mini chainsaw and pole pruner. It easily handles tall branches, low shrubs, slender branches, and thick trunks. No need for complex tools or dangerous ladders, this pole of pruning shears for tree trimming making every pruning job faster, cleaner and stress-free
Testing the Power Pruner Before Use
When it comes to testing the power pruner before use, following these steps is crucial to ensure safety and efficiency:
- Inspect the Pruner: Before each use, make sure to check for any damage or wear on the power pruner. Any signs of wear may indicate the need for maintenance.
- Check the Attachment: Confirm that the power pruner is securely attached to the extension pole by giving it a gentle tug. This step helps prevent any unforeseen detaching during operation.
- Test the Power: Turn on the power pruner and let it run for a few seconds to ensure everything is functioning correctly. Any unusual noises or vibrations should be addressed before use.
Following these steps will help you confidently use your power pruner and achieve optimal results in your tree-trimming tasks.
Safety Tip: Always wear appropriate protective gear such as goggles, gloves, and sturdy footwear when operating a power pruner. Your safety should be a top priority.
Safety Tips for Using a Power Pruner
When** attaching a power pruner**, follow these essential safety tips to ensure a secure and efficient operation:
- Inspect the pruner: Before use, check the pruner for any damage such as cracks, frayed cords, or loose parts.
- Check the attachment: Make sure the pruner is securely connected to the extension pole to prevent accidents during operation.
- Test the power: Ensure the power pruner is functioning correctly by testing it before use to avoid any unexpected issues during operation.
- Wear protective gear: Prioritize your safety by wearing goggles, gloves, and sturdy footwear to protect yourself while operating the power pruner.
Remember, following these safety tips will help you use your power pruner with confidence and peace of mind.
Conclusion
Now that you’re equipped with essential safety tips for using a power pruner, you can confidently tackle your pruning tasks. Remember to always prioritize safety by inspecting your equipment, securing the attachment properly, and testing its functionality beforehand. Don’t forget to gear up with protective goggles, gloves, and sturdy footwear to ensure a safe pruning experience. By following these guidelines, you’ll be able to operate your power pruner efficiently and securely. Happy pruning!
Frequently Asked Questions
1. Why is it important to inspect the power pruner before use?
Inspecting the power pruner helps ensure that it is in good condition, reducing the risk of accidents during operation.
2. How should the power pruner be attached to the extension pole?
Securely attach the power pruner to the extension pole following the manufacturer’s guidelines to prevent it from detaching while in use.
3. Why is wearing protective gear essential when operating the power pruner?
Protective gear like goggles, gloves, and sturdy footwear safeguard against potential injuries from debris or accidental cuts.
4. What should users do before operating the power pruner?
Test the functionality of the power pruner to ensure it is working correctly before use to prevent malfunctions during operation.