

Have you ever wondered what to do with an abundance of seeded grapes? Picture this: a kitchen filled with the sweet aroma of homemade jam simmering on the stove. Imagine spreading that deliciousness on freshly baked bread or swirling it into yogurt. In this article, you’ll discover a simple and rewarding way to turn those seeded grapes into flavorful jam that you can enjoy anytime.
By following the easy steps outlined here, you’ll learn how to transform ordinary seeded grapes into a delectable spread that will elevate your breakfast or snack game. Say goodbye to letting those grapes go to waste and hello to a pantry stocked with your very own homemade grape jam. Get ready to impress yourself and your loved ones with this delightful treat that’s bursting with fruity goodness.
Key Takeaways
- Choose seeded grape varieties like Concord, Muscadine, or Scuppernong for making flavorful jam high in natural pectin.
- Properly wash, de-stem, and crush the grapes to prepare them for jam-making.
- Essential equipment includes a large pot, wooden spoon, potato masher, canning funnel, glass jars, lids, water bath canner or stockpot, thermometer, and more.
- Adjust sugar and pectin levels based on grape sweetness and type to achieve the desired consistency in your jam.
- Follow proper canning techniques to seal jars correctly for long-term storage of homemade grape jam.
- Troubleshoot common issues such as runny or too thick jam by adjusting cooking times or ingredients accordingly.
Choosing the Right Grapes
When making jam with seeded grapes, selecting the appropriate grape varieties is crucial to achieving a flavorful result. Here’s how you can ensure you pick the right grapes for your homemade jam:
Selecting Seeded Grape Varieties
To make delicious grape jam, opt for seeded grape varieties like Concord, Muscadine, or Scuppernong. These grapes are naturally high in pectin, which helps the jam set properly without the need for additional thickening agents. Their robust flavor profiles also contribute to a rich and tasty spread that pairs well with various dishes.
Assessing Grape Quality for Jam
When choosing grapes for jam-making, look for fruits that are ripe but still firm to the touch. Avoid using overripe grapes as they may lead to overly sweet jam or affect the texture negatively. Inspect the grapes for any signs of mold or spoilage and select only fresh, plump berries that promise optimal flavor in your homemade jam.
Necessary Equipment for Making Jam
When it comes to making jam with seeded grapes, having the right equipment is essential to ensure a smooth and successful process. Here are the necessary tools and items you’ll need:
Recommended Products

The canning pot and rack in the market that comes with a food-grade stainless steel canning kit + ½ pint (8 oz) canning scoop + 6 measuring cups - steelcore core porcelain lightweight chemical free pot (Assembled in USA, 365 day back warranty, US & UK based 24/7 customer care).
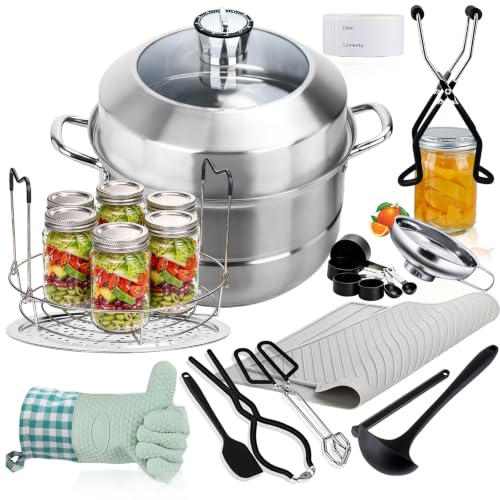
NOTE:Only Suitable for canning cans of 12OZ AND BELOW

✅ Complete 7-Piece Canning Tool Set Includes everything you need for safe and effective home canning: steamer rack, funnel, jar lifter, wrench, tongs, lid lifter, and bubble remover. A must-have kit for beginners and experienced canners alike.
Cooking Tools and Utensils
- Large Pot: You’ll need a large, heavy-bottomed pot to cook the grape jam mixture. Make sure it’s deep enough to prevent splattering while stirring.
- Wooden Spoon: A wooden spoon is ideal for stirring the grapes as they cook down into jam. It won’t react with the acidic fruit like metal utensils might.
- Potato Masher: This tool will help you crush the grapes during cooking to release their juices and achieve the desired consistency for your jam.
- Canning Funnel: A canning funnel makes filling jars with hot jam much easier and helps prevent spills, keeping your work area clean.
- Ladle: Use a ladle to transfer the hot jam into jars without creating a mess or risking burns from spills.
- Glass Jars: Have clean glass jars ready for storing your freshly made grape jam. Ensure they are sterilized before filling them with hot jam.
- Lids and Bands: Make sure you have new lids and bands for sealing your jars of grape jam properly after filling them.
- Water Bath Canner or Large Stockpot: To properly seal your filled jars of grape jam, you’ll need either a water bath canner or a large stockpot deep enough to cover the jars with water by at least an inch during processing.
- Jar Lifter: This tool helps safely lift hot jars in and out of boiling water during canning without risking burns or accidents.
- Kitchen Towels or Jar Rings: Place kitchen towels on your work surface to protect it from heat damage when placing hot jars down, or use jar rings as coasters under hot jars.
- Thermometer: Having a thermometer handy ensures that you maintain accurate temperatures during various stages of making grape jam, especially during canning for proper preservation.
- Cutting Board and Sharp Knife: Use these tools for preparing grapes by washing them thoroughly, removing stems if needed, and cutting larger grapes in half to release their flavors efficiently.
Preparing the Grapes
When it comes to making jam with seeded grapes, preparing the grapes correctly is essential for a successful batch. Here are the steps you need to follow:
Washing and De-stemming
To start, give your grapes a good rinse under cold water to remove any dirt or debris. After washing, carefully pluck off the stems using your fingers or a small knife. Ensure that all stems are removed as they can affect the texture of your jam.
Crushing Grapes with Seeds
Once washed and de-stemmed, it’s time to crush the grapes. You can do this by gently pressing down on each grape using a potato masher or by pulsing them in a food processor for a few seconds. Be mindful not to over-crush them; you want to break them open without completely pulverizing the seeds.
By following these steps, you’ll be well on your way to creating delicious homemade jam from seeded grapes.
Cooking Your Grape Jam
When it comes to cooking your grape jam, there are a few key steps to keep in mind to ensure a successful batch of delicious homemade jam. Let’s dive into the details:
Sugar and Pectin Adjustments
To achieve the perfect consistency and flavor in your grape jam, it’s essential to make sugar and pectin adjustments based on the type of grapes you’re using.
- Sugar: The amount of sugar needed can vary depending on the sweetness of your grapes. For every pound of prepared grapes, you’ll typically need about 1 ½ cups of granulated sugar. Adjust this amount slightly if your grapes are particularly sweet or tart.
- Pectin: Grapes naturally contain pectin, which is crucial for helping the jam set properly. However, some varieties may have lower pectin levels than others. If you’re using grapes with low pectin content, consider adding commercial pectin according to the manufacturer’s instructions to ensure a good gel formation.
The Cooking Process
Cooking your grape jam is where the magic truly happens as the flavors meld together and transform into that luscious spread we all love. Here’s how to nail the cooking process:
- Simmering: Once you’ve combined your prepared grapes with sugar and any necessary pectin, bring the mixture to a gentle boil over medium heat.
- Stirring: Stir frequently to prevent sticking and ensure even cooking. Use a wooden spoon or spatula to break down any large pieces of fruit as they soften.
- Testing for Doneness: To check if your jam is ready, perform a simple wrinkle test by placing a small amount on a chilled plate – it should wrinkle when pushed with your finger.
- Skimming Foam: As your jam cooks, foam may form on the surface due to air bubbles – skim this off regularly for a cleaner finished product.
- Canning: Once your grape jam has reached its desired consistency, ladle it into sterilized jars leaving appropriate headspace before processing them in a water bath canner for long-term storage.
Canning and Preservation
When it comes to canning your freshly made grape jam, proper sealing is essential for longevity. Here’s how you can ensure your jars are sealed correctly:
Recommended Products

INDUCTION COMPATIBLE: The stainless-steel 21.5 quart pot combined with flat, encapsulated base is specifically designed for use with all cooktops, including induction and glass top ranges. The base ensures uniform heat distribution, minimizing hot spots that can lead to uneven processing or jar breakage.

Comprehensive Canning Supplies Starter Kit: This all-in-one canning kit includes a 20 quart canning pot with rack and lid, 7 pieces 16oz mason jars, canning tongs, jar lifter, wide-mouth funnel, magnetic lid lifter, canning labels, measuring cups and spoon set. Perfect for beginners and seasoned canners.

Sealing Jars for Longevity
To seal your jam jars effectively, follow these steps:
- After filling the jars with hot jam, wipe the jar rims clean to remove any residue.
- Place the lids on top of the jars and screw on the bands until fingertip tight.
- Use a water bath canner or steam canner to process the filled jars according to the recipe’s instructions.
- Once processed, carefully remove the jars from the canner and allow them to cool undisturbed.
- Check that each jar has sealed by pressing down on the center of the lid; if it doesn’t pop back up, it’s properly sealed.
Storage Tips
For optimal storage of your homemade grape jam:
- Store sealed jars in a cool, dark place away from direct sunlight.
- Properly sealed jam can last up to a year when stored correctly.
- Once opened, refrigerate any leftover jam and consume within a few weeks for best quality.
Troubleshooting Common Issues
If you encounter any problems while making jam with seeded grapes, here are some solutions to help you overcome them.
Texture and Consistency Problems
- Too Runny: If your grape jam turns out too runny after cooking, it likely didn’t reach the correct temperature for setting. To fix this, reheat the jam and add more pectin while ensuring it reaches the desired thickness before canning.
- Too Thick: On the other hand, if your jam is too thick or solidifies excessively, it may have been cooked for too long or contain an excess of pectin. To soften it, stir in a bit of water or fruit juice gradually until you achieve the desired consistency.
- Separation: If you notice that your grape jam is separating into liquid and solids after cooling, it could be due to improper stirring during cooking. To prevent this, make sure to stir continuously while simmering and avoid overcooking.
- Too Sweet: In case your grape jam turns out overly sweet, balance the flavor by adding a squeeze of lemon juice to enhance tartness and cut through the sweetness without affecting the overall taste profile significantly.
- Lacking Sweetness: Conversely, if your jam lacks sweetness or tastes too tart, consider incorporating additional sugar in small increments until you reach the desired level of sweetness without overpowering the natural grape flavor.
Conclusion
You’ve now learned how to turn seeded grapes into delicious homemade jam. By following the steps outlined in this article, you can create a flavorful batch of grape jam that will impress your friends and family. Remember to choose the right grape varieties, prepare them correctly, adjust sugar and pectin levels as needed, and follow proper canning techniques for optimal results. With a little practice and attention to detail, you’ll soon be enjoying your own tasty grape jam on toast, pastries, or even as a sweet gift for loved ones. Happy jam-making!
Frequently Asked Questions
Q: What grape varieties are recommended for making homemade jam?
A: Concord, Muscadine, or Scuppernong grapes are ideal due to their high pectin content.
Q: What equipment is necessary for making grape jam at home?
A: Basic equipment includes a large pot, jars, lids, a canning funnel, and a ladle for preserving.
Q: How should grapes be prepared before making jam?
A: Grapes need to be washed, de-stemmed, and crushed properly for successful jam-making.
Q: What are the key steps in cooking grape jam?
A: Essential steps include simmering the mixture, stirring frequently, testing doneness, skimming foam, and proper canning techniques.
Q: How can I troubleshoot common issues with grape jam consistency?
A: Adjustments can be made for runniness, thickness, separation by modifying sugar levels or using additional pectin.
